Installing usage
tracking in OBIEE 11g, whilst fairly straight forward in principal, is made
overly complex because the repository and web components havn’t been upgraded to 11g –
it’s still in its old 10g format, which means firstly it needs to be upgraded
to 11g format and secondly it needs some additional fields add to it. It also
needs to be configured to connect directly to an oracle data source rather than
going via odbc. I've heard whispers that an 11g version of the RPD is available from somewhere, not sure where, but the web catalog isn't. These instructions assume you are just starting from the basic OBIEE 11g install. (specifically 11.1.1.6 patched to 11.1.1.6.4, but I don't think usage tracking is much affected by recent patches)
Note that by default
Usage Tracking is recorded in the xxx_BIPLATFORM schema that gets created by
the Repository Creation Utility at the start of the OBIEE installation. You can
place it somewhere else, but this blog assumes you haven’t.
The xxx_BIPLATFORM
schema does not contain all of the tables require for usage tracking. There are
two date tables which need to be imported. Fortunately there are scripts that
come with OBIEE to do this.
Open up a command
window and navigate to the OBIEE_HOME\instances\instance1\bifoundation\OracleBIServerComponent\coreapplication_obis1\sample\usagetracking\SQL_Server_Time
directory (don’t worry about the reference to SQL Server in the final directory
name!)
Run sqlplus,
connecting to your xxx_BIPLATFORM schema, then run the following four script
files:
sqlplus
xxx_biplaform/password@sid
@Oracle_create_nQ_Calendar.sql
@Oracle_create_nQ_Clock.sql
@Oracle_nQ_Calendar.sql
@Oracle_nQ_Clock.sql

The first two scripts
create the two new tables (ignore the drop error the script generates). The
last two files populate the tables with data. When you’ve run all four, run a
commit and exit from sqlplus.

To upgrade the usage
tracking repository start by taking a copy of the usage tracking RPD. This is
called UsageTracking.rpd and can be found in the OBIEE_HOME
\instances\instance1\bifoundation\OracleBIServerComponent\coreapplication_obis1\sample\usagetracking
directory. Copy it to a temporary directory.
This needs to be
upgraded to 11g. If you try to open it in the Admin tool you see the following
message:

To upgrade it we use
the obieerpdmigrateutil.exe utility. In a command window set the
ORACLE_INSTANCE environment variable to your OBIEE_HOME \instances\instance1
directory, change directory to ORACLE_HOME\Oracle_BI1\bifoundation\server\bin
then run obieerpdmigrateutil.exe with the following parameters:
-I location and name
of existing RPD
-O location and name
of new RPD
-L file name to store
local users in – not relevant, but it needs it anyway
-U Administrator
user-name - Administrator
e.g.:
set ORACLE_INSTANCE=C:\app\obiee\instances\instance1
cd c:\app\obiee\Oracle_BI1\bifoundation\server\bin
obieerpdmigrateutil.exe -I
c:\temp\UsageTracking.rpd -O c:\temp\NewUsageTracking.rpd -L c:\temp\ldif -U
Administrator
When asked for the encryption password, it means the new repository password which is required by 11g. Just give it a simple password for now as it will be merged into your main repository later on.

You should now be able
to open the new usage tracking RPD (NewUsageTracking.rpd) off-line in the Admin
tool:

We now need to add
extra fields to the S_NQ_ACCT table in the physical layer. This is because
Oracle have added extra fields to the actual table and altered the usage
tracking functionality in OBIEE to use them. If they are not in the RPD, OBIEE
will fail to update the table with usage details.
Expand the S_NQ_ACCT table in the physical layer and check that all of the following fields exist with the correct data type.
Rename RUNAS_USER_NAME to IMPERSONATOR_USER_NAME then add in those that are missing (right click on S_NQ_ACCT, select New -> Physical Column…) - ID, QUERY_BLOB and QUERY_KEY.
Finally change the data type for all of the DOUBLE fields below from INT to DOUBLE. It is important that the Nullable field is correct on every field.
Note: be very careful
not to include spaces before or after the names of each field renamed or
added…the spaces will be retained and prevent the write back from working.
Field Name Data
Type Length Nullable?
CACHE_IND_FLG CHAR 1 No
COMPILE_TIME_SEC DOUBLE Yes
CUM_DB_TIME_SEC DOUBLE Yes
CUM_NUM_DB_ROW DOUBLE Yes
END_DT DATETIME Yes
END_HOUR_MIN CHAR 5 Yes
END_TS DATETIME Yes
ERROR_TEXT VARCHAR 250 Yes
ID VARCHAR 50 No
IMPERSONATOR_USER_NAME VARCHAR 128 Yes
NODE_ID
VARCHAR 15 Yes
NUM_CACHE_HITS DOUBLE Yes
NUM_CACHE_INSERTED DOUBLE Yes
NUM_DB_QUERY DOUBLE Yes
PRESENTATION_NAME VARCHAR 128 Yes
QUERY_BLOB LONGVARCHAR 4000
Yes
QUERY_KEY VARCHAR 128 Yes
QUERY_SRC_CD VARCHAR 30 Yes
QUERY_TEXT
VARCHAR 1024 Yes
REPOSITORY_NAME VARCHAR 128 Yes
ROW_COUNT DOUBLE Yes
SAW_DASHBOARD VARCHAR 150 Yes
SAW_DASHBOARD_PG VARCHAR 150 Yes
SAW_SRC_PATH VARCHAR 250 Yes
START_DT DATETIME Yes
START_HOUR_MIN CHAR 5 Yes
START_TS DATETIME Yes
SUBJECT_AREA_NAME VARCHAR 128 Yes
SUCCESS_FLG DOUBLE Yes
TOTAL_TIME_SEC DOUBLE Yes
USER_NAME VARCHAR 128 Yes
Now right click on
S_NQ_ACCT, select Physical Diagram -> Objects and Direct Joins.

The joins to S_ETL_TIME_DAY and S_ETL_DAY are fine, but the join to NQ_LOGIN_GROUP is broken – the line is red and there is no arrow. Click on it and delete it.
Now click
on the new join icon

and draw a new join from S_NQ_ACCT to NQ_LOGIN_GROUP and change the join condition to:
"OBI Usage
Tracking"."Catalog"."dbo"."NQ_LOGIN_GROUP"."LOGIN"
= "OBI Usage
Tracking"."Catalog"."dbo"."S_NQ_ACCT"."USER_NAME"

Then click ok to save
and close the diagram.
Now right click on
S_NQ_ACCT and select properties. If there is no Key defined, enter ID in Key
name and select the ID field from the drop down in the Columns field. This
defines the key on the table. Click ok.

Now to sort out the connection details to the xxx_BIPLATFORM schema. From the menu in Admin select Manage -> Variables
.

There are only two – OLTP_USER and OLTP_DSN. Edit each one and change the default initializer. Note that the values must be enclosed in single quotes.
Edit each one by
double clicking on it and change the default initializer. Note that the values
must be enclosed in single quotes

Set OLTP_USER to xxx_BIPLATFORM (replace the xxx with the actual prefix for your installation)
Set OLTP_DSN to the
TNSNAME of the database.

Close the window.
In the Physical layer
right click on ‘OBI Usage Tracking’ database, select properties. In the General
tab change the Database to Oracle 11g (or whatever type of database you
installed the xxx_BIPLATFORM schema in when you installed Oracle)

Then click on the Features tab and click the ‘Reset to defaults’ button

Click ok to save.
Now right click on the ‘Connection Pool’ connection pool, select Properties.
Make sure the Call Interface is set correctly for your database – OCI 10g/11g for Oracle 10g or 11g. Then type in the correct password to the xxx_BIPLATFORM schema. Then click ok and re-enter the password as prompted.

Now edit the ‘Usage Tracking Writer Connection Pool’ connection pool and make the same changes as above.
Finally in the Admin tool, to fix an annoying message later on, from the menu click Manage -> Identity.

Click on the Application Roles tab, select the top role – BIAdministrators, right click on it and select delete. Once this RPD has been merged with your main repository this group just causes an unnecessary warning message in the consistency checker.
Now save the
repository – check consistency when prompted to ensure there are no errors or
warnings.
We are now ready to
merge this RPD with your main repository. If you’ve never merged repositories
before, this process may seem a little odd, but just following it through
anyway.
Firstly when merging
to completely separate repositories (as opposed to two slightly different ones,
e.g. master and amended), you need a blank RPD file to help the process
through. Essentially merging repositories is a three-way process, comparing the
differences between the first two and then merging those differences into a
third.
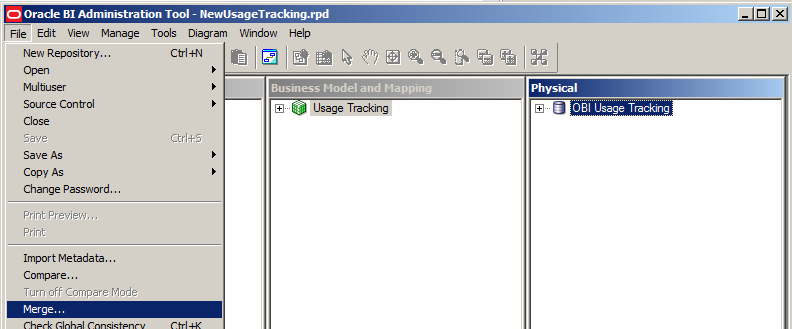
To create a blank
repository, select File -> New Repository.
Enter a name (blank.rpd), a location (the temp directory), click the No
option against import metadata then enter a simple password. Finally click
Finish.

Now copy your main
repository to the temp directory (you wouldn’t want to attempt this on-line,
trust me!)Next open the new
Usage tracking RPD off-line. Then from
the menu select File -> Merge…
In the Merge Wizard screen select Merge Type ‘Full Repository Merge’
Then select the Blank RPD as the Original Master Repository and enter its password.
Then select your main Repository as the Modified Repository and enter its password.
Leave the Save Merged Repository as the default name (usually the same name with (1) at the end) – you can rename it later once the merge is complete.
Leave Equalize during merge unchecked. Click Next.

The next screen controls how the merge will happen. All we need to do is specify how the Usage Tracking subject area is to be added. From the little drop down in the Decision column choose ‘Current’. Then click Finish.

The merge won’t take long and you’ll be left with a new RPD which is a copy of your main RPD with the Usage tracking components added in:

Check consistency (Ctrl-E) to ensure all is ok.
You will need to reset
the password as this will have the simple password entered above when you
upgraded the usage tracking RPD to 11g. Select File -> Change Password from
the menu to do this.
Then close the Admin
tool. You can now deploy this RPD to
your OBIEE environment. Rename the RPD file if required then deploy using the
enterprise manager as normal.


Once OBIEE has restarted login to the dashboards and view a dashboard. You can then view the S_NQ_ACCT table in the database and see that it has started populating with usage details:
Enable Usage Tracking
With the database and repository now up to date we can enable usage tracking in OBIEE.
To do this login to
the Enterprise Manager, expand Weblogic Domain in the navigation pane, right
click on bifoundation_domain and select System MBean Browser:

When the MBean Browser
appears, look under Application Defined MBeans, expand oracle.biee.admin, then
Domain: bifoundation_domain, then BIDomain. Finally click on the second
BIDomain underneath, and in the right hand window select the Operations tab:

Now click on the ‘lock’
link. When the right hand window changes, click on the Invoke button

You should see the
operation executed successfully confirmation message.
Back in the MBean
browser list, expand BIDomain.BIInstance.ServerConfiguration and click on BIDomain.BIInstance.ServerConfiguration
beneath it. Then click on the Attributes tab in the right hand window.

The bottom five
attributes need setting to enable usage tracking:

Leave UsageTrackingCentrallyManaged
as true.
Set
UsageTrackingConnectionPool to "OBI Usage Tracking"."Usage
Tracking Writer Connection Pool"
Leave UsageTrackingDirectInsert
as true
set UsageTrackingEnabled to true
set
UsageTrackingPhysicalTableName to "OBI Usage Tracking"."Catalog"."dbo"."S_NQ_ACCT"

Then click the Apply
button at the top of the attributes window.
Now go back to the second
BIDomain screen under BIDomain as above and select the Operations tab again.
This time click on the
second Commit option. Click Invoke when the screen changes and wait for the
confirmation message:

Now we need to restart
the OBIEE services.
In the Navigation pane
expand Business Intelligence, click on coreapplication, select the overview tab
in the right hand window and click on Restart.

Once OBIEE has restarted login to the dashboards and view a dashboard. You can then view the S_NQ_ACCT table in the database and see that it has started populating with usage details:

If you see no records,
then usage tracking has failed to start. Look in the nqserver.log file (located
under OBIEE_HOME\instances\instance1\diagnostics\logs\OracleBIServerComponent\coreapplication_obis1)
to see if there are any error messages.
A common message is [59053]
Usage Tracking stopped because the specified Usage Tracking table contained the
wrong number of columns or a column with an inappropriate data type. This means
that the S_NQ_ACCT table in the RPD has not been setup properly, go back and
check that all of the fields are there, they are named correctly (check for
spaces in the field names), they have the correct data type and the nullable
field is set properly. Correct any errors and redeploy.
Install the Usage Tracking Web Catalog
You can now create
your own usage reports using the Usage Tracking subject area in the RPD,
however Usage Tracking also comes with a default set of dashboards and reports
which you can install into your catalog to get you going.
In the OBIEE_HOME\instances\instance1\bifoundation\OracleBIServerComponent\coreapplication_obis1\sample\usagetracking directory is a zip file: UsageTracking.zip, copy this to your temp directory and unzip it.
Now go into the unzipped UsageTracking directory and then into \root\shared. In here locate the directory usage+tracking and the file usage+tracking.atr. Copy both of them into the shared folder of your main catalog. If you haven’t changed it this will be under OBIEE_HOME\instances\instance1\bifoundation\OracleBIPresentationServicesComponent\coreapplication_obips1\catalog.
Under here will be the directory for the name of the catalog (SampleAppLite in my case), then root\shared.
Now open the Catalog Manager.

From the menu select File -> Open Catalog and open online under the main weblogic administrator user-id:

If you’ve not done this before you’ll need to enter the URL which will be http://obiee-server:9704/analytics/saw.dll

You’ll see the Usage Tracking folder, but with no Owner and No Access.
Right click on Usage
Tracking and select Properties.

Set the Owner the weblogic administrator user, make sure Hidden is unchecked and click Apply Recursively. Click ok.
Now right click on
Usage Tracking again and select Permissions.

The first thing to do here is delete the <unresolved account> permissions. This are hangovers from OBIEE 10g. Select both and click the right arrow button

Now select
Authenticated User and BI Administrator role from the right hand window and
click the left arrow button. In the left hand window then change the Permission
against the BI Administrator Role to Full Control. Click Apply Recursively. Click ok.

You can now click on the Usage Tracking folder and see it’s contents:

For some reason the permissions set just above only go down one level, so you can now see the three folders above, but you still have no access to their contents.
Click into the _portal
folder and against the usage tracking folder within repeat the properties and
permissions settings above, however this time after setting the permissions go
back into the properties screen and untick the hidden option, apply recursively
and click ok again. Repeat this with the Subject Area Contents folder (again
untick the Hidden attribute as well).
Finally on the Usage
Monitoring Reports folder select all of the report files within and repeat the
properties and permissions settings (you can select all and do all files
together).
Now log into OBIEE
under the weblogic administrator user. You won’t be able to see the dashboards
yet as the reports still need to be upgraded to 11g. Click on the
Administration link in the top right corner.
Click on the option in
the bottom left: “Scan and Update Catalog Objects That Require Updates”:

Click update
The scan won’t take
long and should report a number of objects have been updated:

Click Back.
The Usage Tracking
dashboard fails to get updated properly, so we need to create a new dashboard
and then copy the contents across. From the main OBIEE menu select New ->
Dashboard

Enter the name New Usage Tracking, select /Shared Folders/Usage Tracking/Dashboards from the Location drop down and tick the ‘Add content later’ option. Click ok.

Now in the catalog navigate to Shared Folders -> Usage Tracking -> _portal -> Usage Tracking:

Highlight the file Dashboard then click the copy icon

in the menu above.Then click on the New
Usage Tracking folder and click the paste icon

Now click on the
_portal folder, then click More -> Delete under the Usage Tracking folder in
the right hand window.

Then click More -> Rename under New Usage Tracking and rename to Usage Tracking.
In the Dashboard menu,
click on the Usage Tracking dashboard

This will open the
blank ‘Page 1’ of the “new” dashboard we created a second a ago, so edit the
dashboard:

And use the

icon to delete ‘Page 1’.

Then click Run.
Before running any
reports the upgrade process on the catalog breaks the definition of the filters
used by the reports. Fortunately there are only three of them. Outside of OBIEE
navigate to the catalog \shared\usage+tracking\_filters\usage+tracking folder.
There six files here, but ignore the three with the extension .atr
Edit each one in a
text editor, replacing “**NONE**” with “Usage Tracking” (there is only one
occurrence in each file).
We’re there! Click on a report on the dashboard to run it:

